Programmatic Features
In addition to the basic, publishing and sharing features intended for use by both non-programming and programming users, the g2nb environment also provides a variety of features intended primarily for use by programmers.
Programmatic Features
1. Code Cells
Code cells allow a user to execute Python code. They are the default type of cell. Simply enter the Python code
you want to run and then click the  (run cell) button in the notebook toolbar.
More information on code cells and their various options is available in the Jupyter documentation.
2. Python Libraries
A variety of useful Python libraries come already installed in the g2nb environment. These include pandas, matplotlib, scikit-learn, numpy, ndex2 and the GenePattern Python Library, among others. See the Packages, Kernels, and Extensions page for more information.
A complete tutorial on using the GenePattern Python Library is available as a public notebook in the g2nb Notebook Repository. Additional information is available in the published example notebooks on GitHub.
3. Send to Code
The widgets provided by g2nb tools seamlessly integrate with programmatic execution. Code examples of how to reference GenePattern or Galaxy jobs or result files from UI Builder cells are available by clicking a job result and selecting “Send to Code” in the menu.
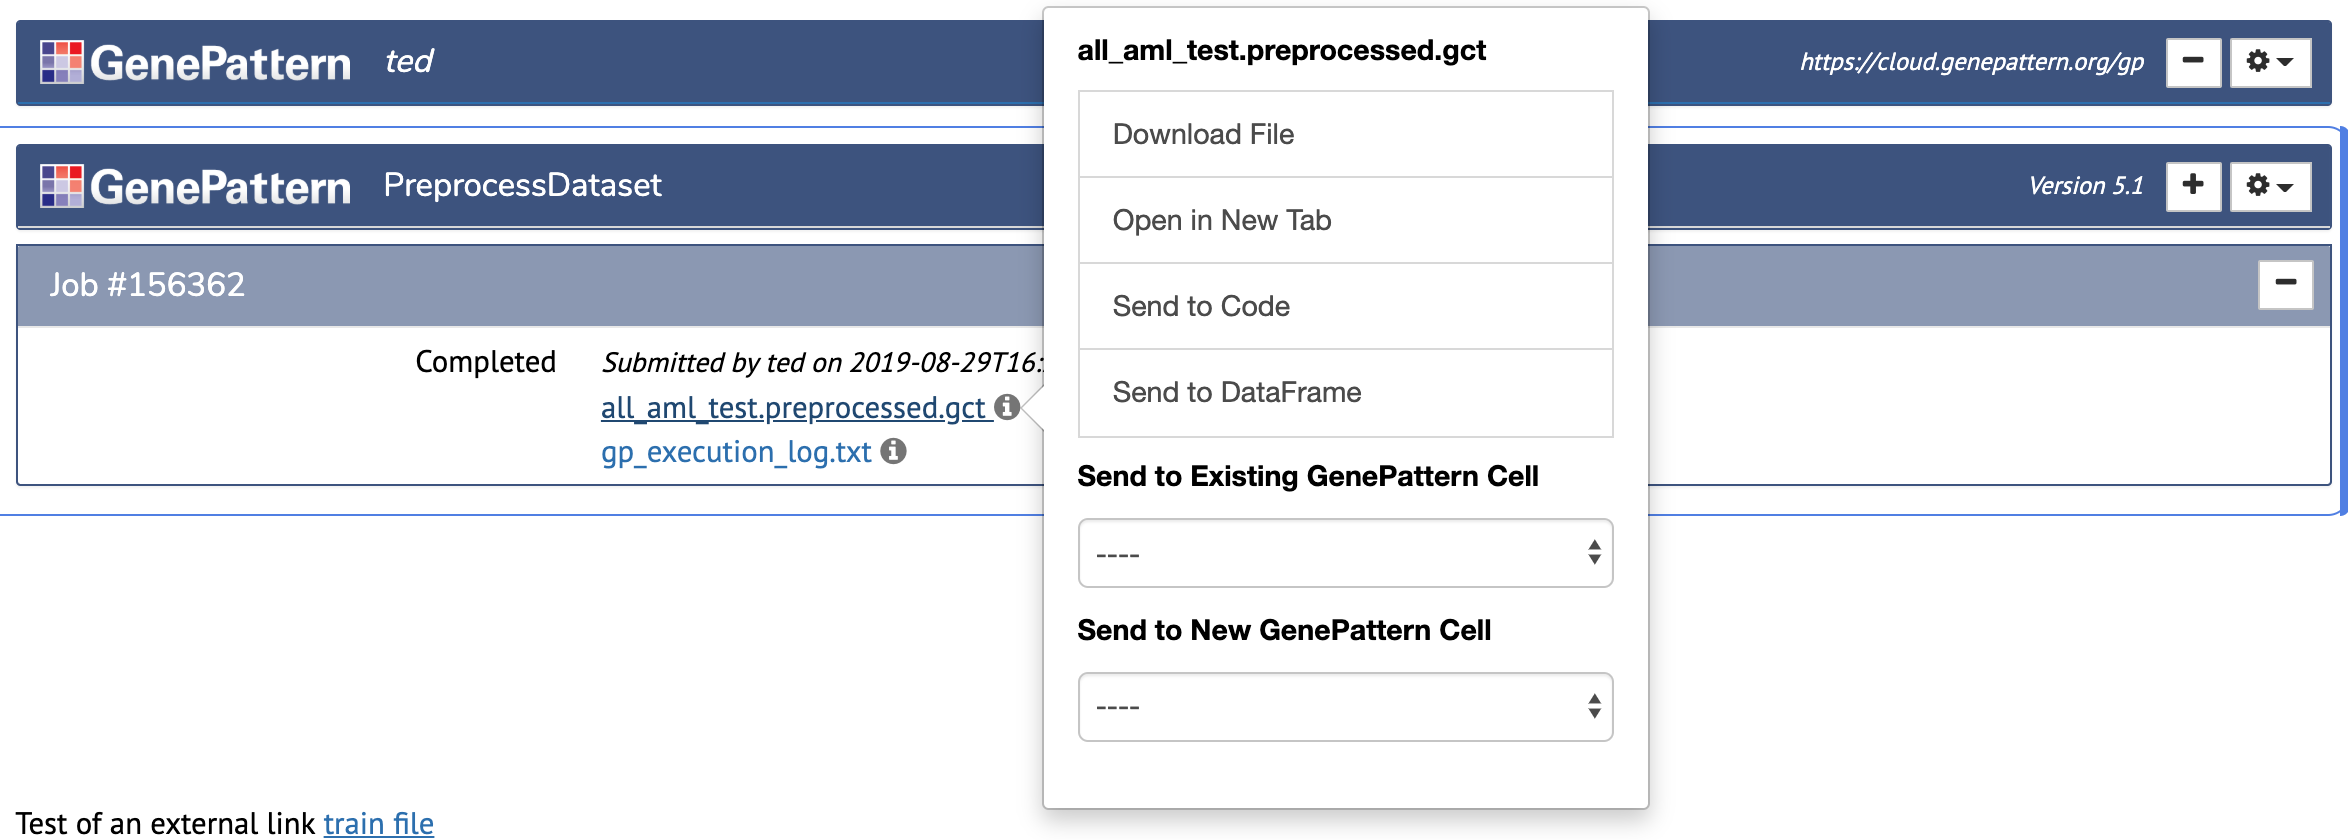
This will add a new cell below prefilled with the python to retrieve the file.

4. Send to Dataframe
For file formats that represent array-type data, g2nb provides functionality allowing them to be loaded directly to a Pandas dataframe. Currently supported file types are GCT and ODF file formats.
To load a compatible file as a dataframe, click on the job result and select “Send to Dataframe” in the menu.

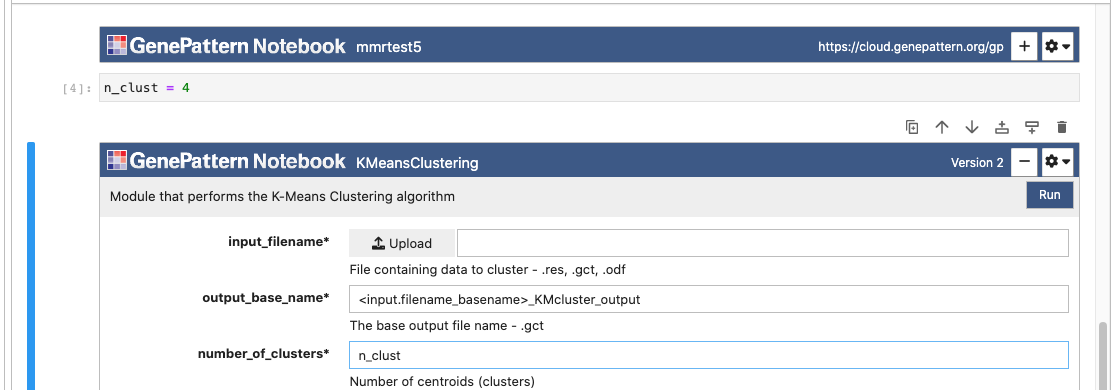
5. Python Variable Input
As part of the seamless integration between Python and g2nb, Python variables may be directly used as input in g2nb tool cells. To use a Python variable as input, enter it into the input field of an analysis cell. When the "Run" button is clicked to launch the analysis, the notebook will evaluate the variable and pass the result as the input parameter. Note: variables are cast as strings when they are evaluated.
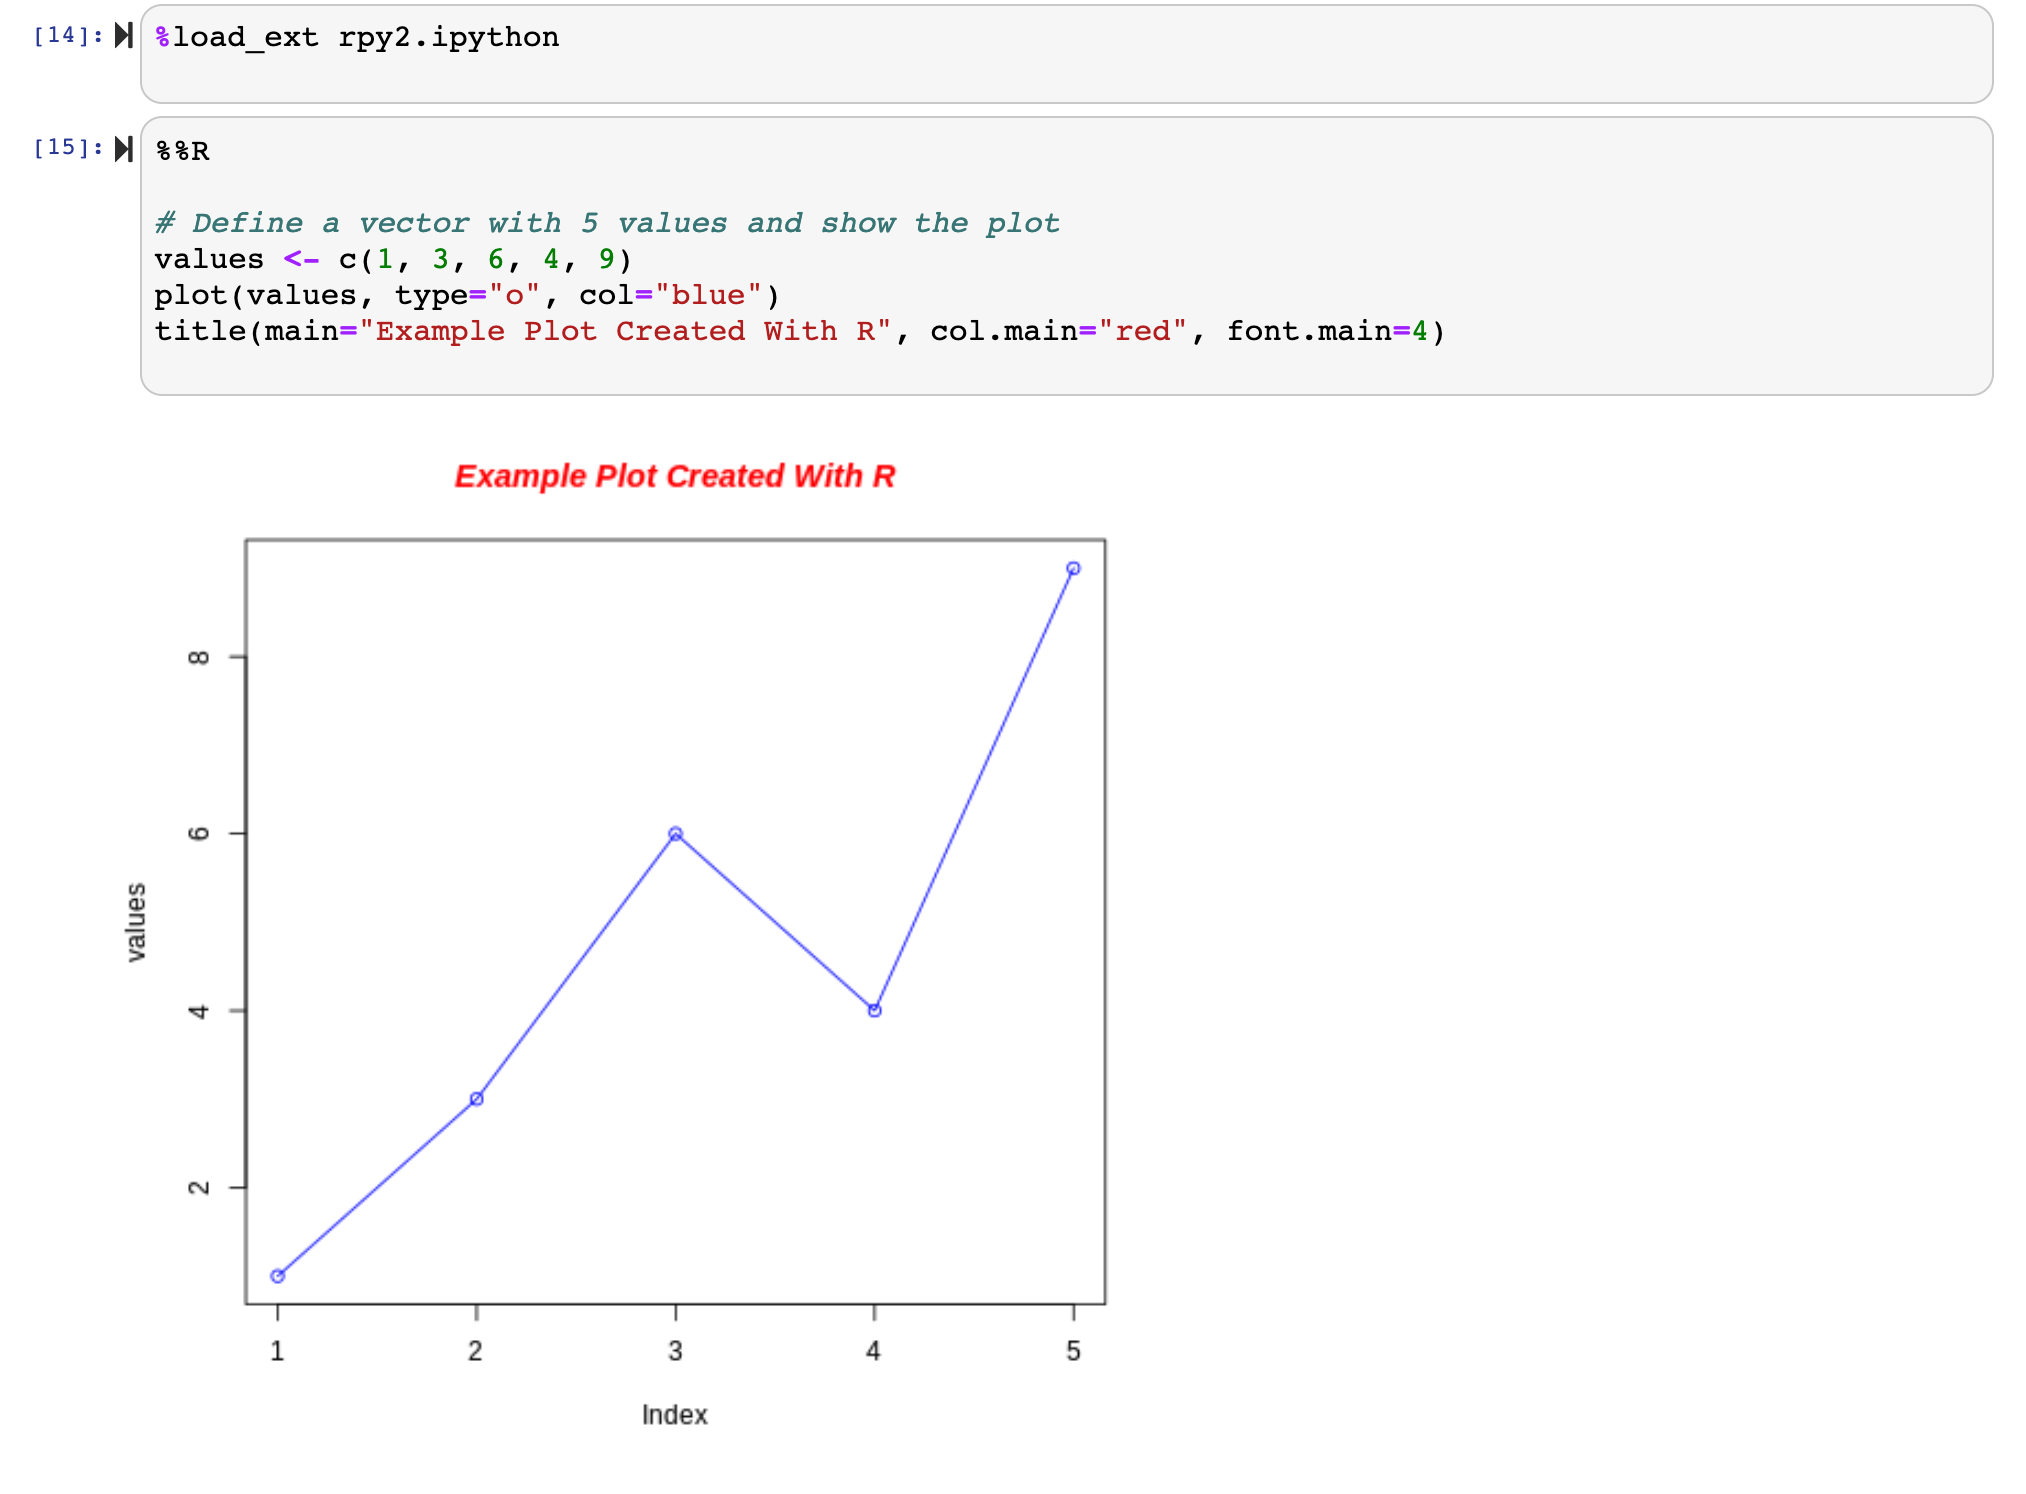
6. R Support
The g2nb platform supports R through the use of R magics command. To begin using R, you first need to load the R magics extension. This can be achieved by running the following code within your notebook:
% load_ext
rpy2.ipython
After the extension has been loaded, beginning a cell with
%%R
will tell the notebook environment to execute the rest of the code in the cell using R rather than Python. An example is given below.
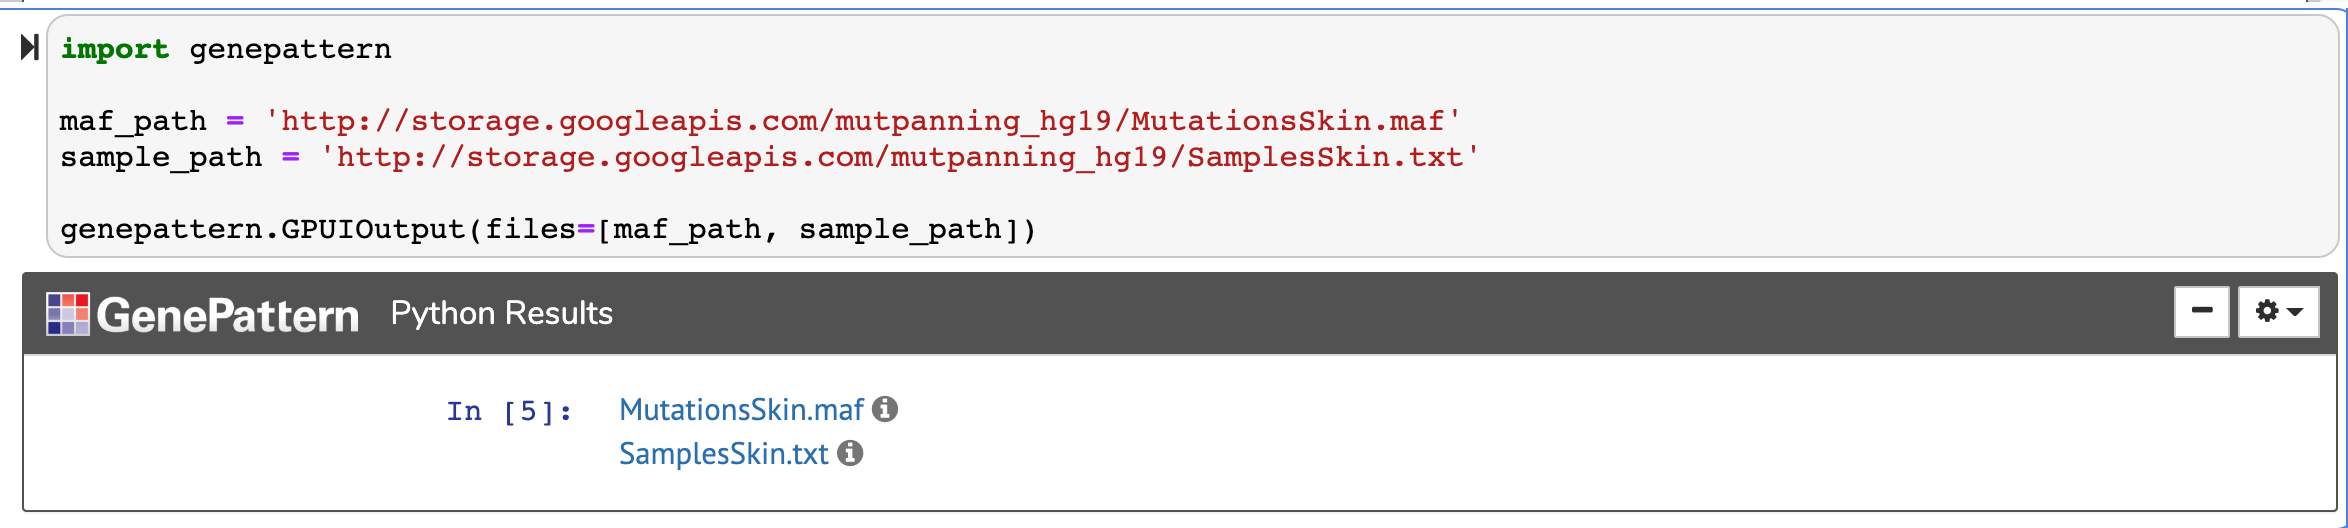
7. Using externally-hosted files in a g2nb notebook
To add an externally-hosted file to the drop-down list of inputs for a g2nb analysis, add the
nbtools-markdown-file class to the file as shown below.
<a class="nbtools-markdown-file" href="http://example.url">The text to link here.</a>
To provide an externally-hosted file with the g2nb data flow features (Send to Code, Send to Dataframe, Send to analysis cell, etc.), format your links as UI Builder outputs. To do this, provide an array of 1 or more
links to the nbtools.UIOutput() method and return it at the end of a cell. An example (with code also displayed) is
shown below.
8. Installing Packages
While the g2nb Workspace comes with many popular bioinformatic and machine learning packages already installed, it also provides the ability to customize your workspace by installing new libraries. Behind the scenes, each kernel in the Workspace is encapsulated in a conda environment.
Installing Through PIP
Once the correct conda environment has been activated, installing new packages through PIP is as easy as adding the
--user parameter to the PIP command. (You may need to shut down and restart your notebook if it was opened before
the library was installed.)
pip install --user <package_name>
Installing Through Conda
Installing packages through conda requires one additional step. You must first tell conda where to install new packages, then you can install them using a simple conda install command. See the commands below.
Without this additional conda config command, packages will install successfully, but will be lost each time you log in.
conda config --add pkgs_dirs ~/.local/lib/python3.9/site-packages
conda install <package_name>
Cytoscape
Cytoscape is an open source software platform for visualizing complex networks and integrating them with any type of attribute data.
You can connect a notebook to a Cytoscape instance running on your computer using the py4cytoscape library. This library comes pre-installed in the g2nb Workspace, otherwise you may install it by executing the following command:
pip install py4cytoscape sphinx
Once installed, open Cytoscape on your computer and then active Cytoscape's Jupyter-Bridge inside the notebook by executing the following code inside a Python cell:
import py4cytoscape as p4c
import IPython
print(f'Loading Javascript client ... {p4c.get_browser_client_channel()} on {p4c.get_jupyter_bridge_url()}')
browser_client_js = p4c.get_browser_client_js()
IPython.display.Javascript(browser_client_js) # Start browser client
If prompted, you may need to also install the FileTransfer app inside your Cytoscape instance.
Once the Python code above has executed successfully, you may call Cytoscape functions and visualize networks diectly from your notebook. Documentation for this is available on Cytoscape's Read the Docs.
Globus Connect
Globus is a way to reliably transfer files of any size between web-based resources. It can be used to transfer files between your g2nb workspace and your local storage, or any Globus endpoint. If you do not have access to a Globus endpoint, you can create a personal endpoint with Globus Connect.
To use Globus Connect, you will first need to sign up for a free Globus account. You will also need to log in to the Globus file manager and create a personal endpoint.
This can be accomplished by selecting "Endpoints" from the Globus interface and then clicking " Create a Personal Endpoint" in the upper right. Give this new endpoint a name like "g2nb" and then click the "Generate Setup Key" button. Copy and save this key.
Inside g2nb, open a new terminal and then set up your Globus endpoint by running:
/opt/gcp/globusconnectpersonal -setup <GENERATED_KEY> -dir ~
This will create the configuration needed to synchronize your g2nb project directory. Finally, to begin the Globus synchronization, run the following command:
/opt/gcp/globusconnectpersonal -start -dir ~
As long as this process is running, Globus will continue to synchronize your files between g2nb and any other connected endpoint. For more information, see the Globus documentation.
UI Builder
The UI Builder is a way to display any Python function or method call as an interactive widget. This will render the parameters of the function as a web form.
The UI Builder will use any existing docstring for the function as a description, will infer parameter types from default values and will display parameter annotations as helpful text near each input.
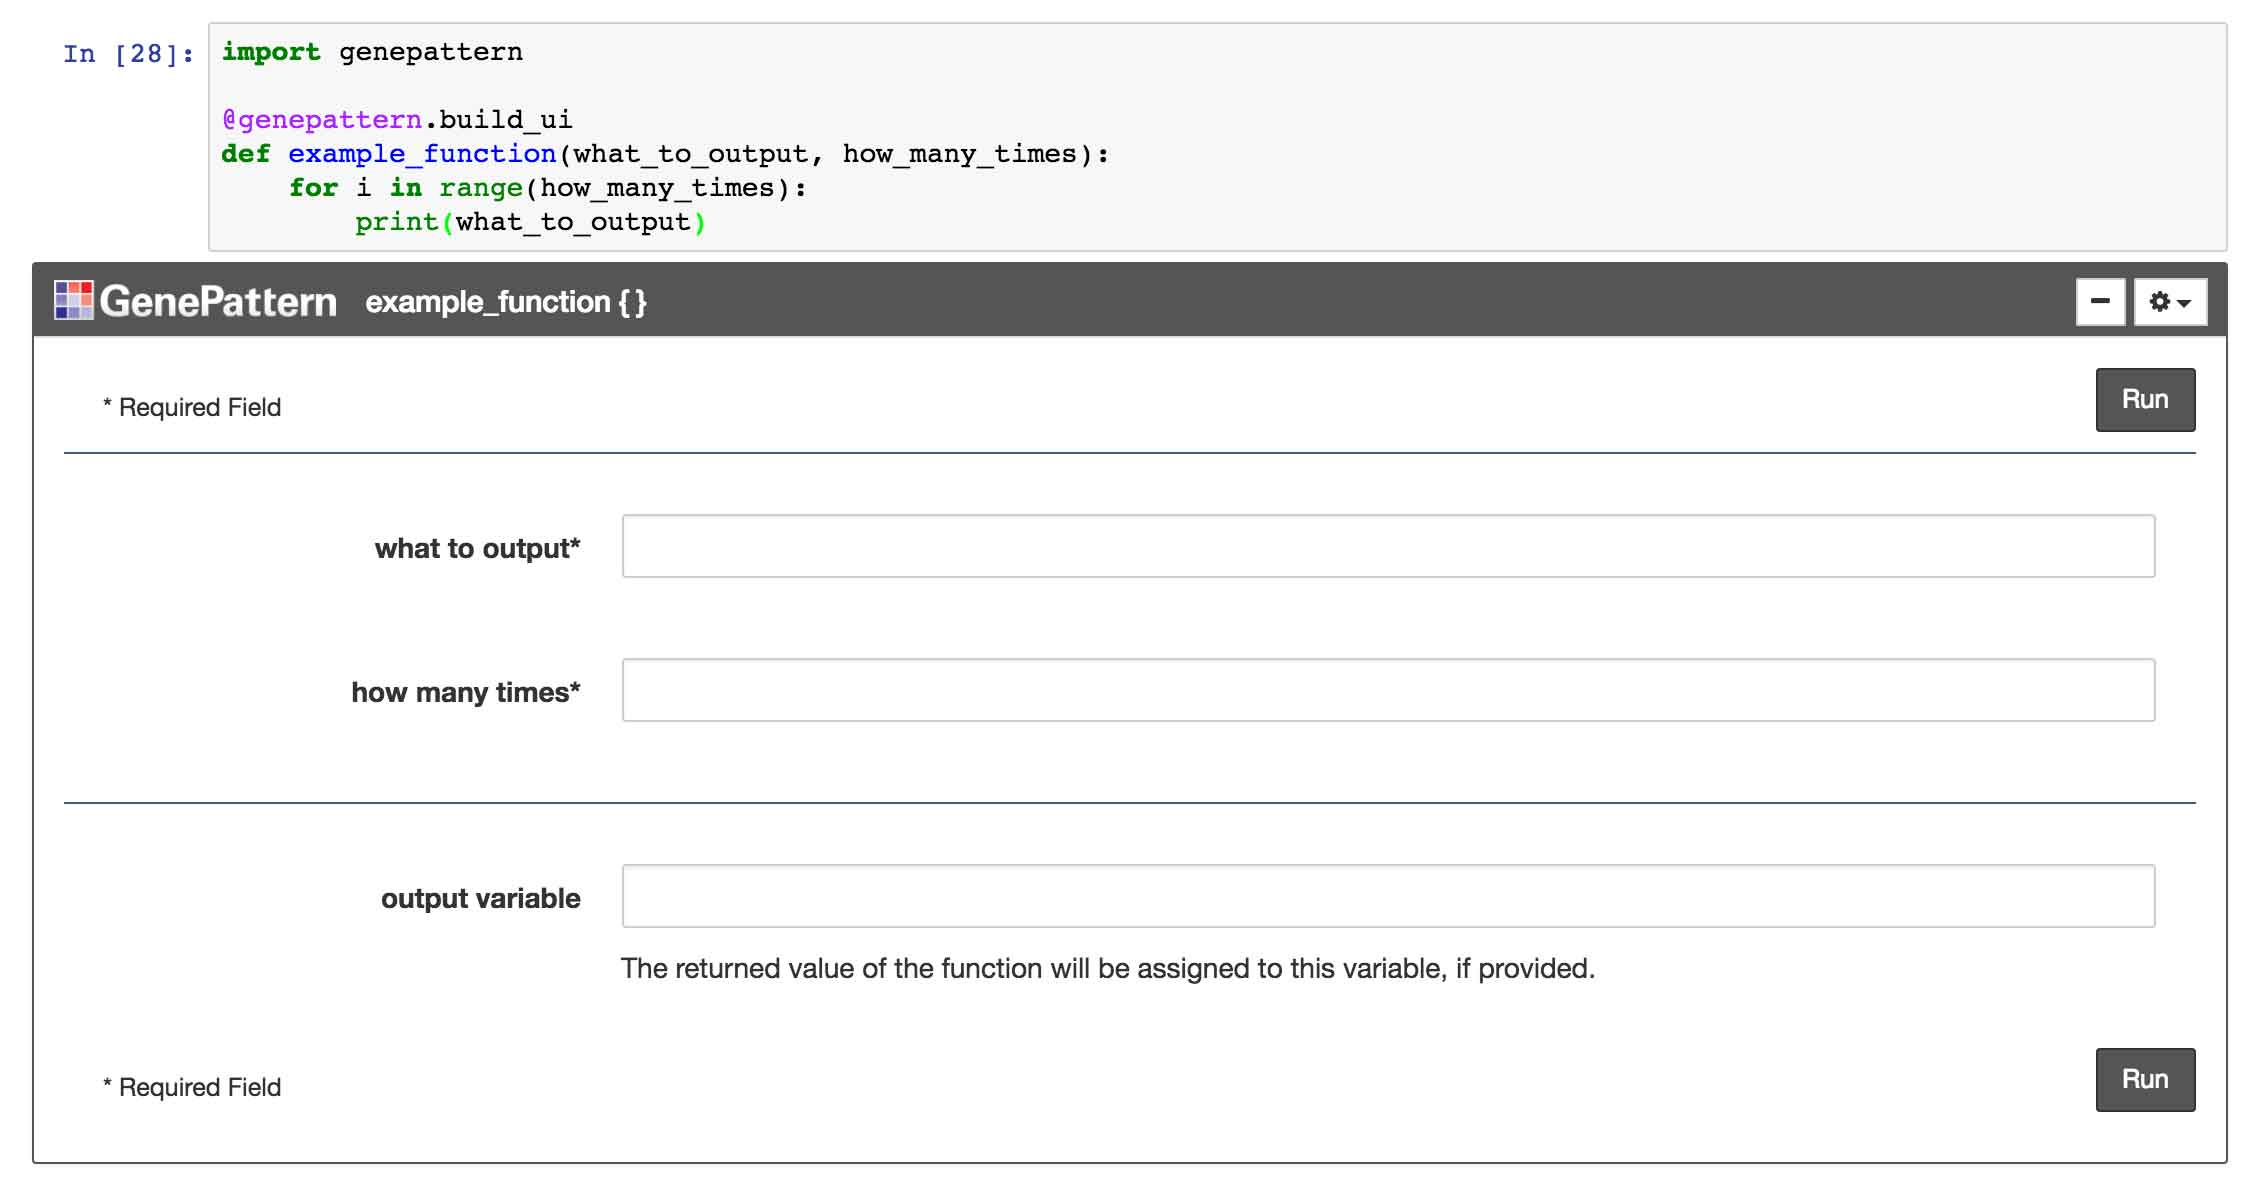
1. Build the UI
The simplest way to render a function using the UI Builder is to import the nbtools package and then attach the
@build_ui decorator to the function's definition. A code example for this is given below:
import nbtools

@nbtools.build_ui
def example_function(first_parameter, second_parameter):
    ...
Alternatively, the UI Builder widget may be defined and referenced directly. To render a function in this way, simply
import the UIBuilder class from the nbtools package and pass the function to the UIBuilder constructor. To
display the widget, just return the UIBuilder object in a Jupyter code cell. A code example is provided below:
from nbtools import UIBuilder

def example_function(first_parameter, second_parameter):
    ...

# Create the UIBuilder object and immediately return it
UIBuilder(example_function)
2. Python Variables & String Literals
Python variables may be used as input when filling out a UI Builder form. To do this, simply type the name of the variable into the input field. When the form is submitted, the widget will pass a reference to the variable to the resulting function call.
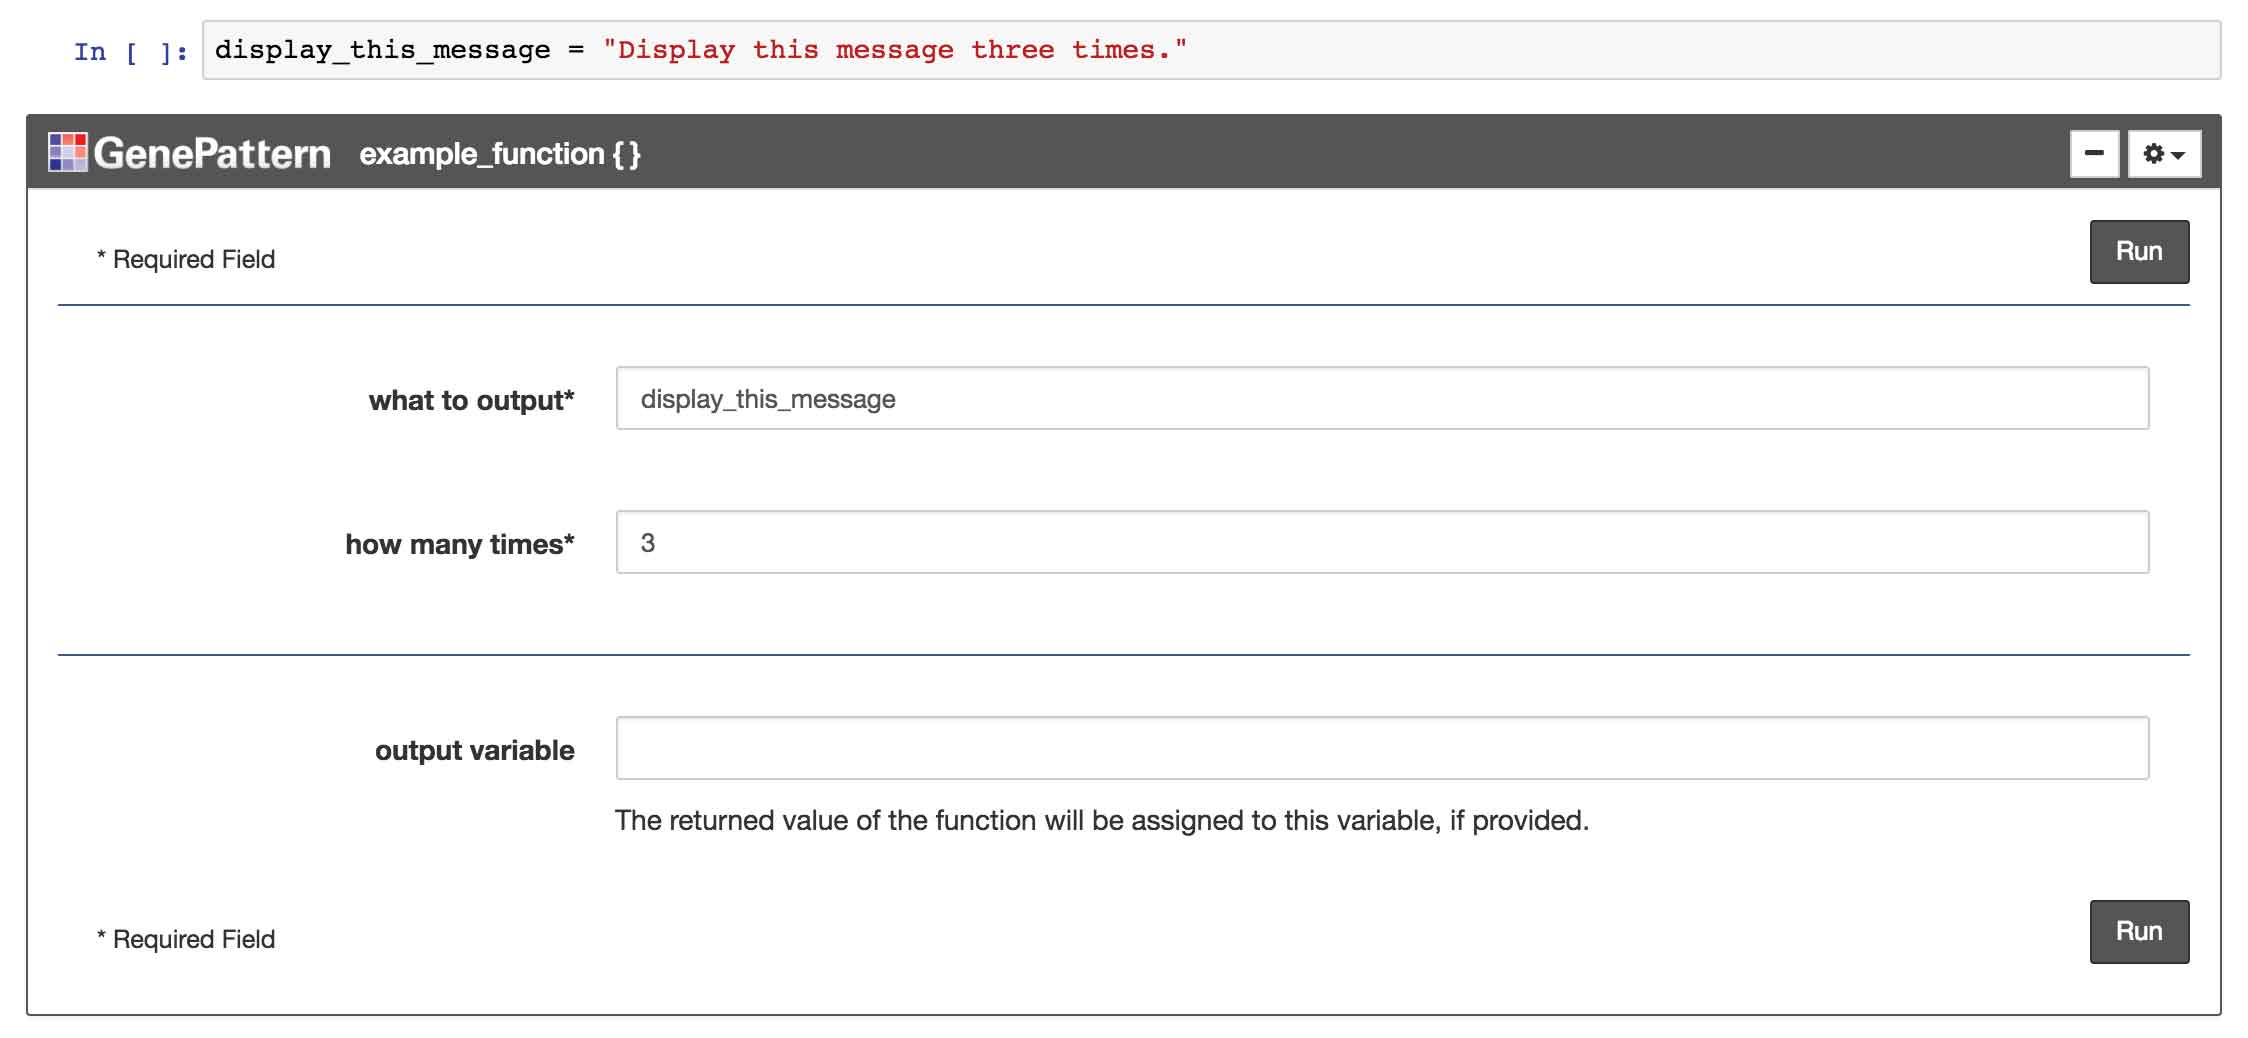
Conversely, to ensure that an input value is evaluated as a string literal rather than a variable name, a user can wrap the input to a particular field in either single or double quotes (' or "). This tells the UI Builder to skip checking for variable names and to treat the value in quotes as a literal string. For example, forcing the string foo to be treated as a string literal would be entered in the input field as:
"foo"
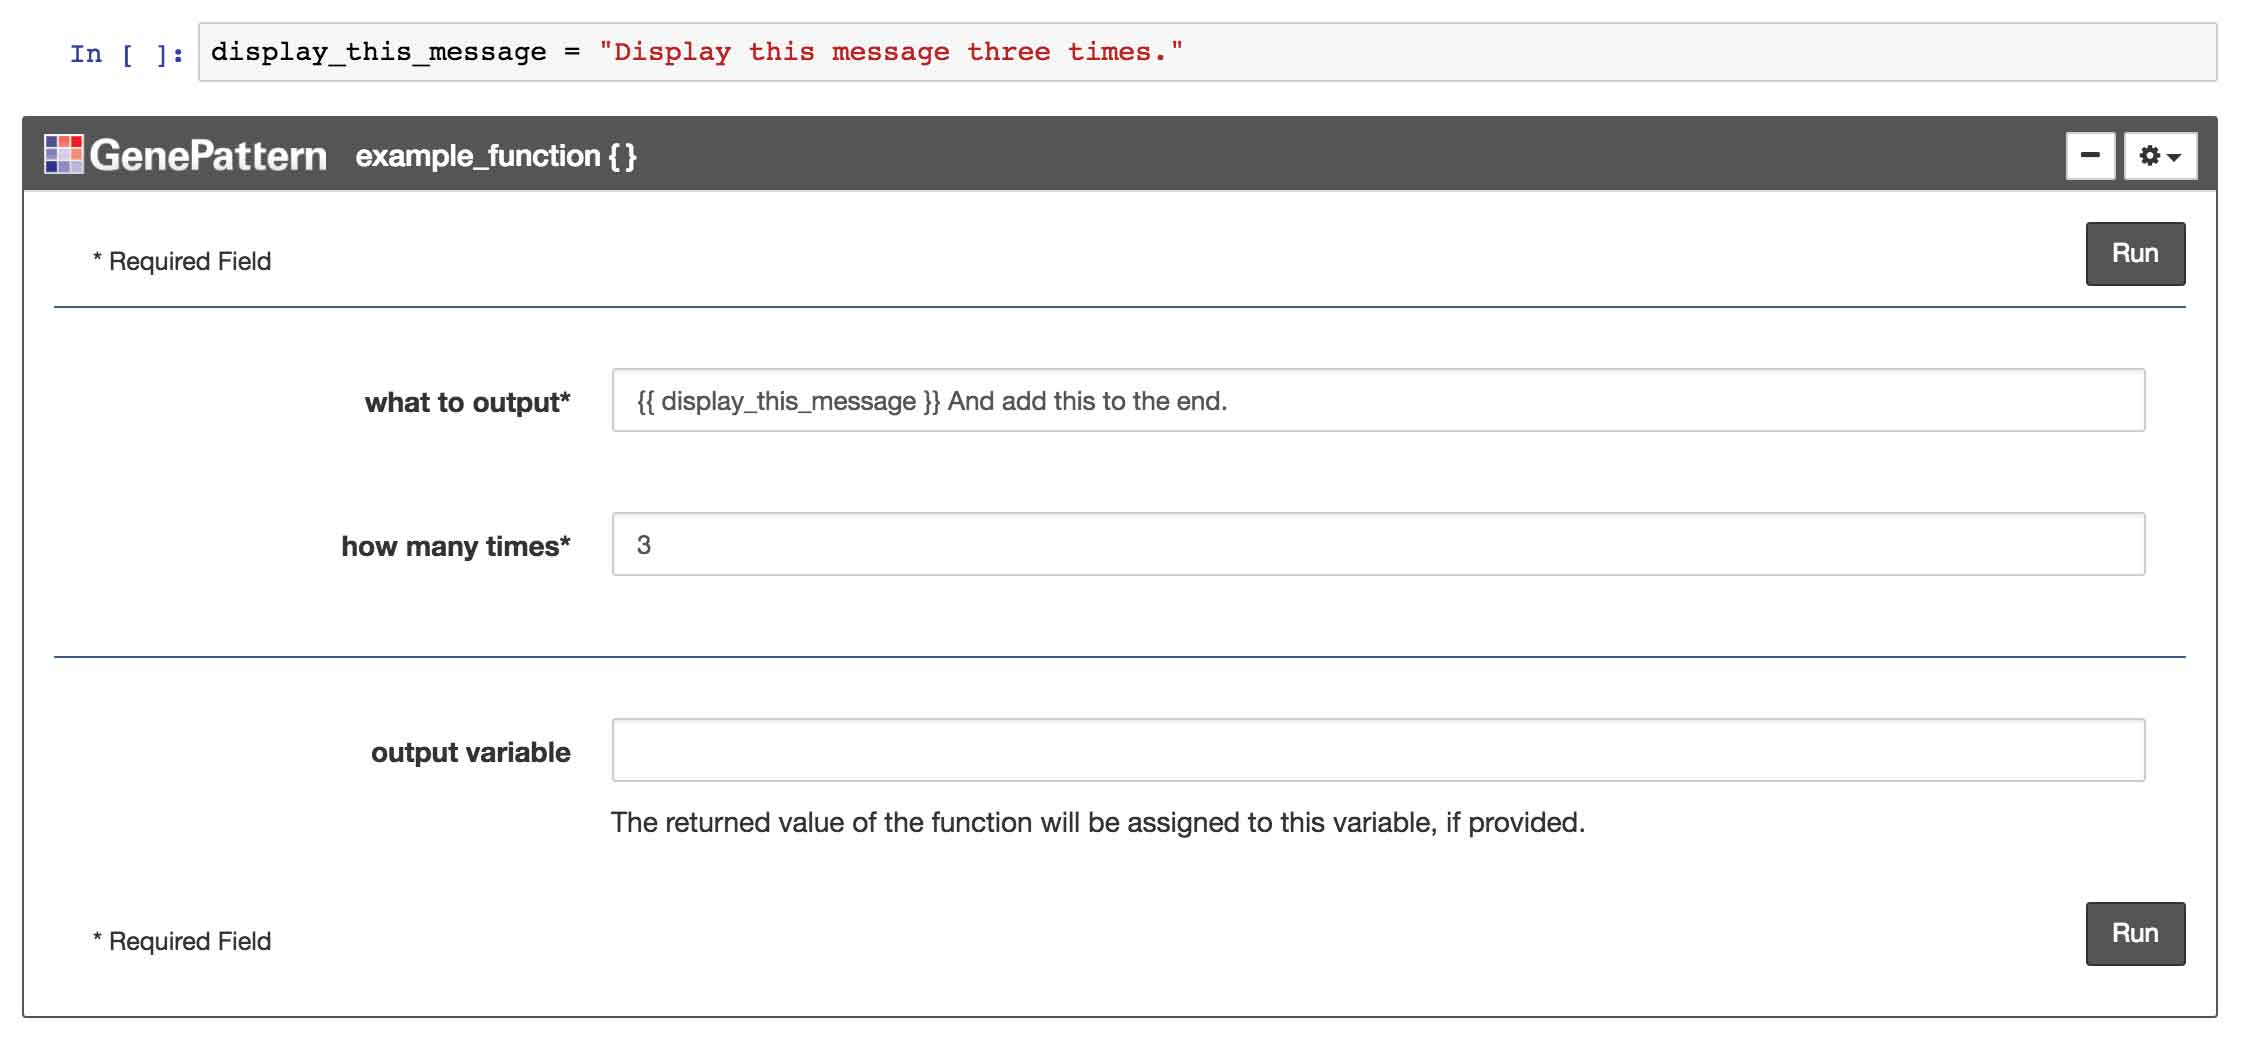
3. String Serialization
The input to a UI Builder form may include a string representation of a variable's value rather than a reference to the variable itself. This is useful for embedding the value inside a larger string, or when passing a variable reference would be unwanted.
This functionality can be achieved by placing the variable name inside double curly brackets. For example, embedding the
string serialization of the variable foo would be entered into an input field as:
{{ foo }}
4. Rendering Existing Functions
Existing Python functions, such as those included in third-party Python libraries, can also be used with the UI Builder.
To display an existing function first import it and then pass the function into the constructor of the UIBuilder
object. Return this object in a cell to display the resulting widget. For example, the code for displaying
scikit-learn's KMeans function is given below.
import nbtools
import sklearn.cluster

nbtools.UIBuilder(sklearn.cluster.KMeans)
5. Overriding Properties
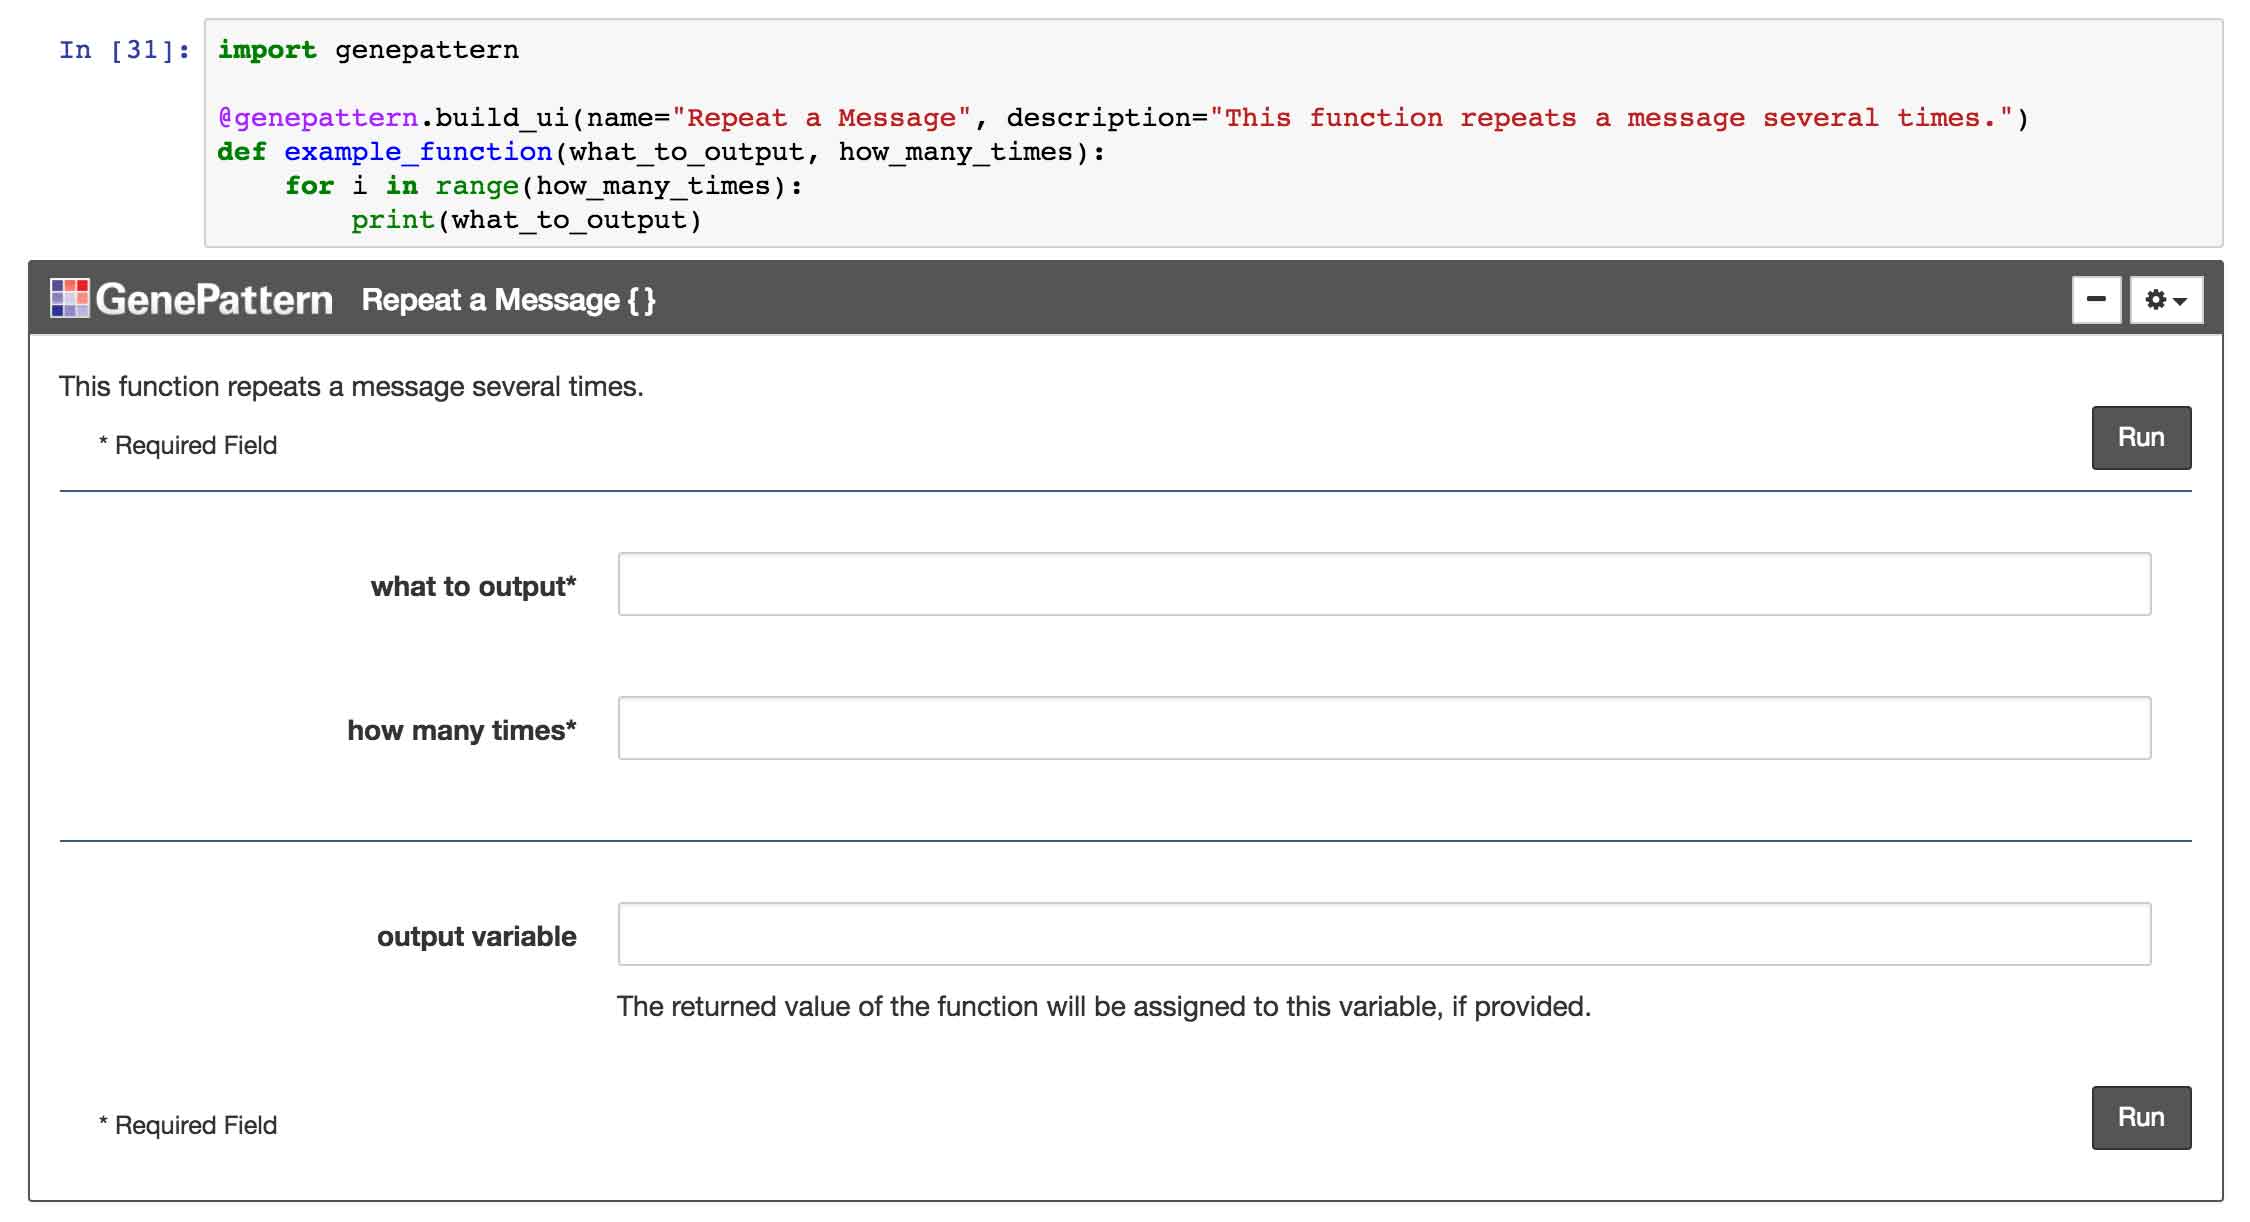
By default, the widget name will be the function name, the description will be the docstring of the function and the parameter names will be the same as the parameters defined in the code. All of these, however, can be manually overridden. This is particularly useful whe providing better names or descriptions that users would find helpful.
To override the default values, optional parameters may be passed into the build_ui decorator or into the UIBuilder
constructor. Examples overriding the widget name and description are given below.
The bottom example also demonstrates overriding the canonical name of the function being rendered. This is sometimes helpful if the function has been imported into the code in a non-top level namespace.
@nbtools.build_ui(name="Simple Example",
                  description="This is an example function.")
def example_function(param_1, param_2):
    . . .
The same effect can be also achieved when directly instantiating the UIBuilder object.
nbtools.UIBuilder(sklearn.cluster.KMeans,
                  name="KMeans Clustering",
                  description="Groups data into K clusters",
                  function_import="sklearn.cluster.KMeans")
6. Overriding Parameters
The names and descriptions of individual parameters may also be overridden. In this case, a dictionary may be passed to
the @build_ui decorator or the UIBuilder constructor with the parameter's name as the key and the properties to
override as the value.
A code example is given below which overrides the name of a parameter, the description of the parameter and the default value of the parameter.
@nbtools.build_ui(parameters={
    "param_1": {
        "name": "foo",
        "description": "This parameter has been renamed.",
        "default": "bar",
        "optional": True
    }
})
def example_function(param_1, param_2):
    ...
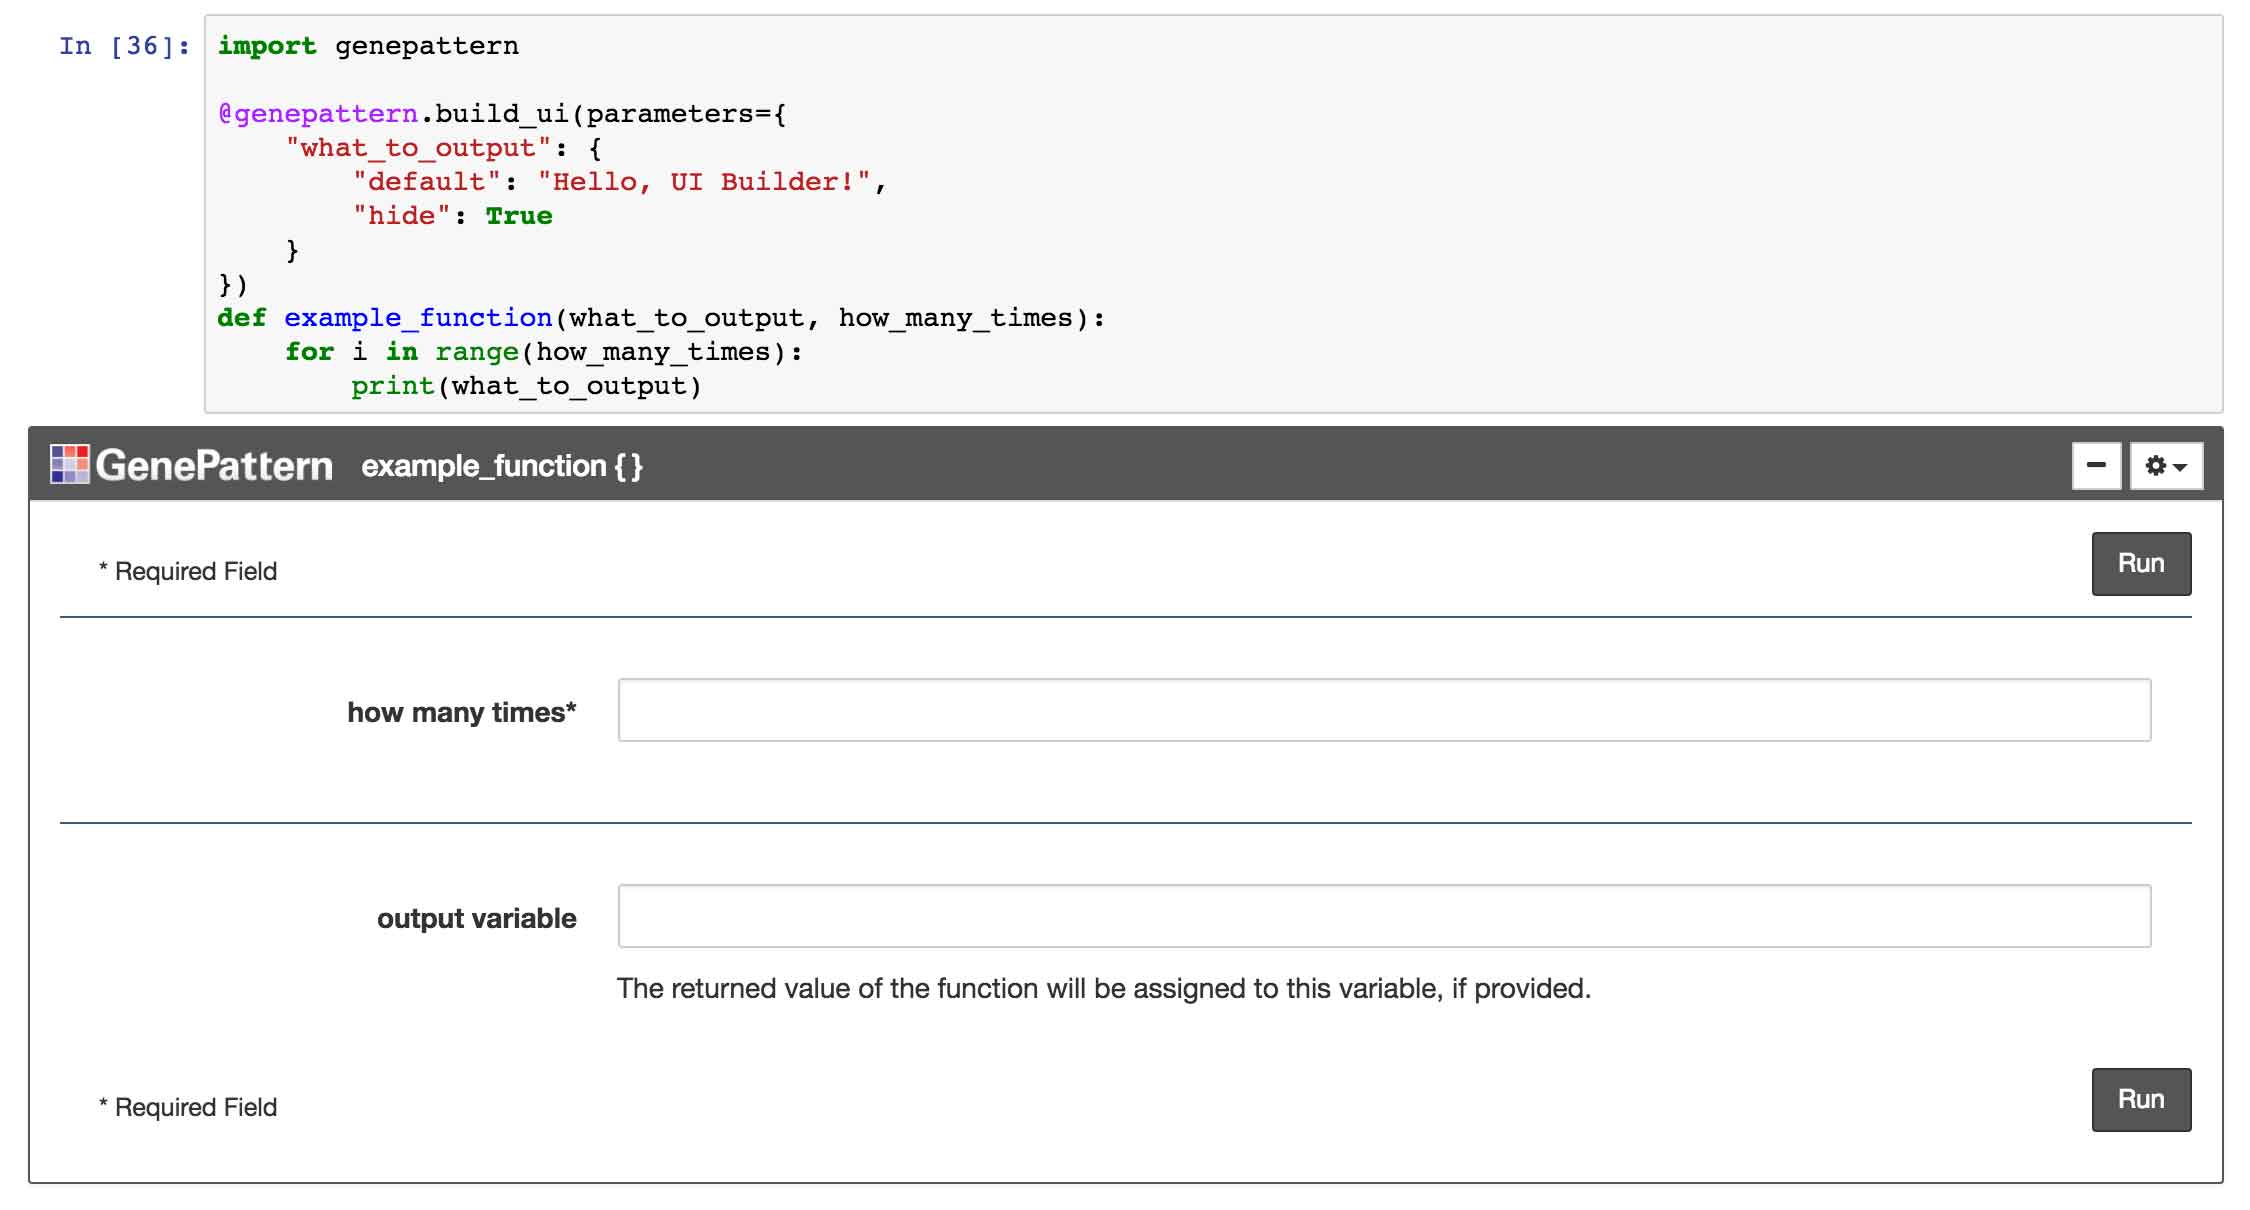
7. Hiding Parameters
Sometimes a particular function has parameters that shouldn't be changed in the current context. The UI Builder has the ability to hide the input for these parameters, simplifying the user interface and allowing users to focus only on the relevant inputs. When the function is called, the hidden parameters will automatically use their default values. This may be combined with overriding the default value for the parameter in question in order to force a particular input.
A code example is given below in which several parameters of scikit-learn's KMeans implementation are hidden.
nbtools.UIBuilder(sklearn.cluster.KMeans, parameters={
    "init": { "hide": True },
    "verbose": { "hide": True },
    "random_state": { "hide": True, "default": 1234 },
    "copy_x": { "hide": True }
})
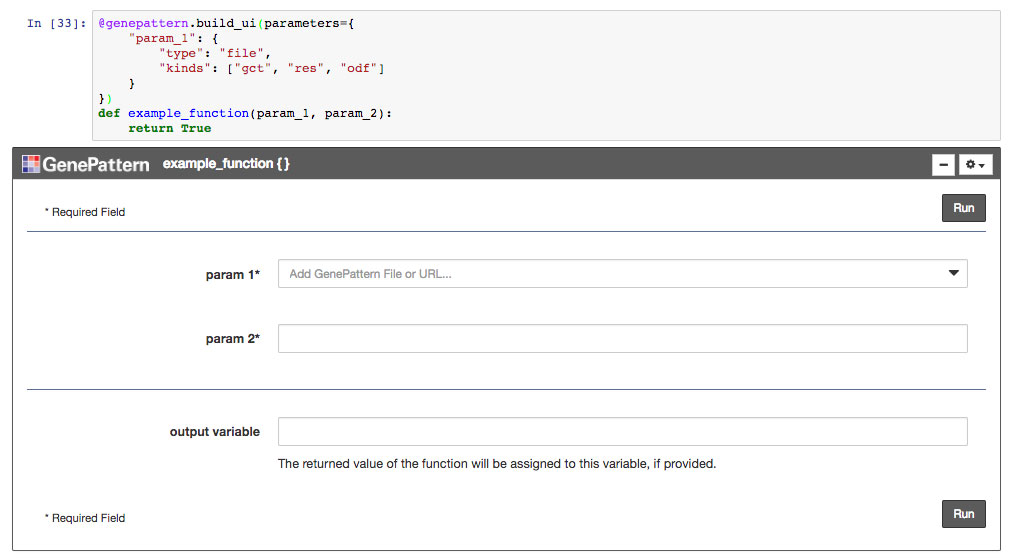
8. Output Variable
The result of a UI Builder function can optionally be assigned to a Python variable. By default, a text field for this
variable will appear at the bottom of each UI Builder widget. This field can be overridden just like any other parameter
using the output_var parameter name. This includes the ability to change the label, description, assign a default value
or hide the parameter. A code example is given below.
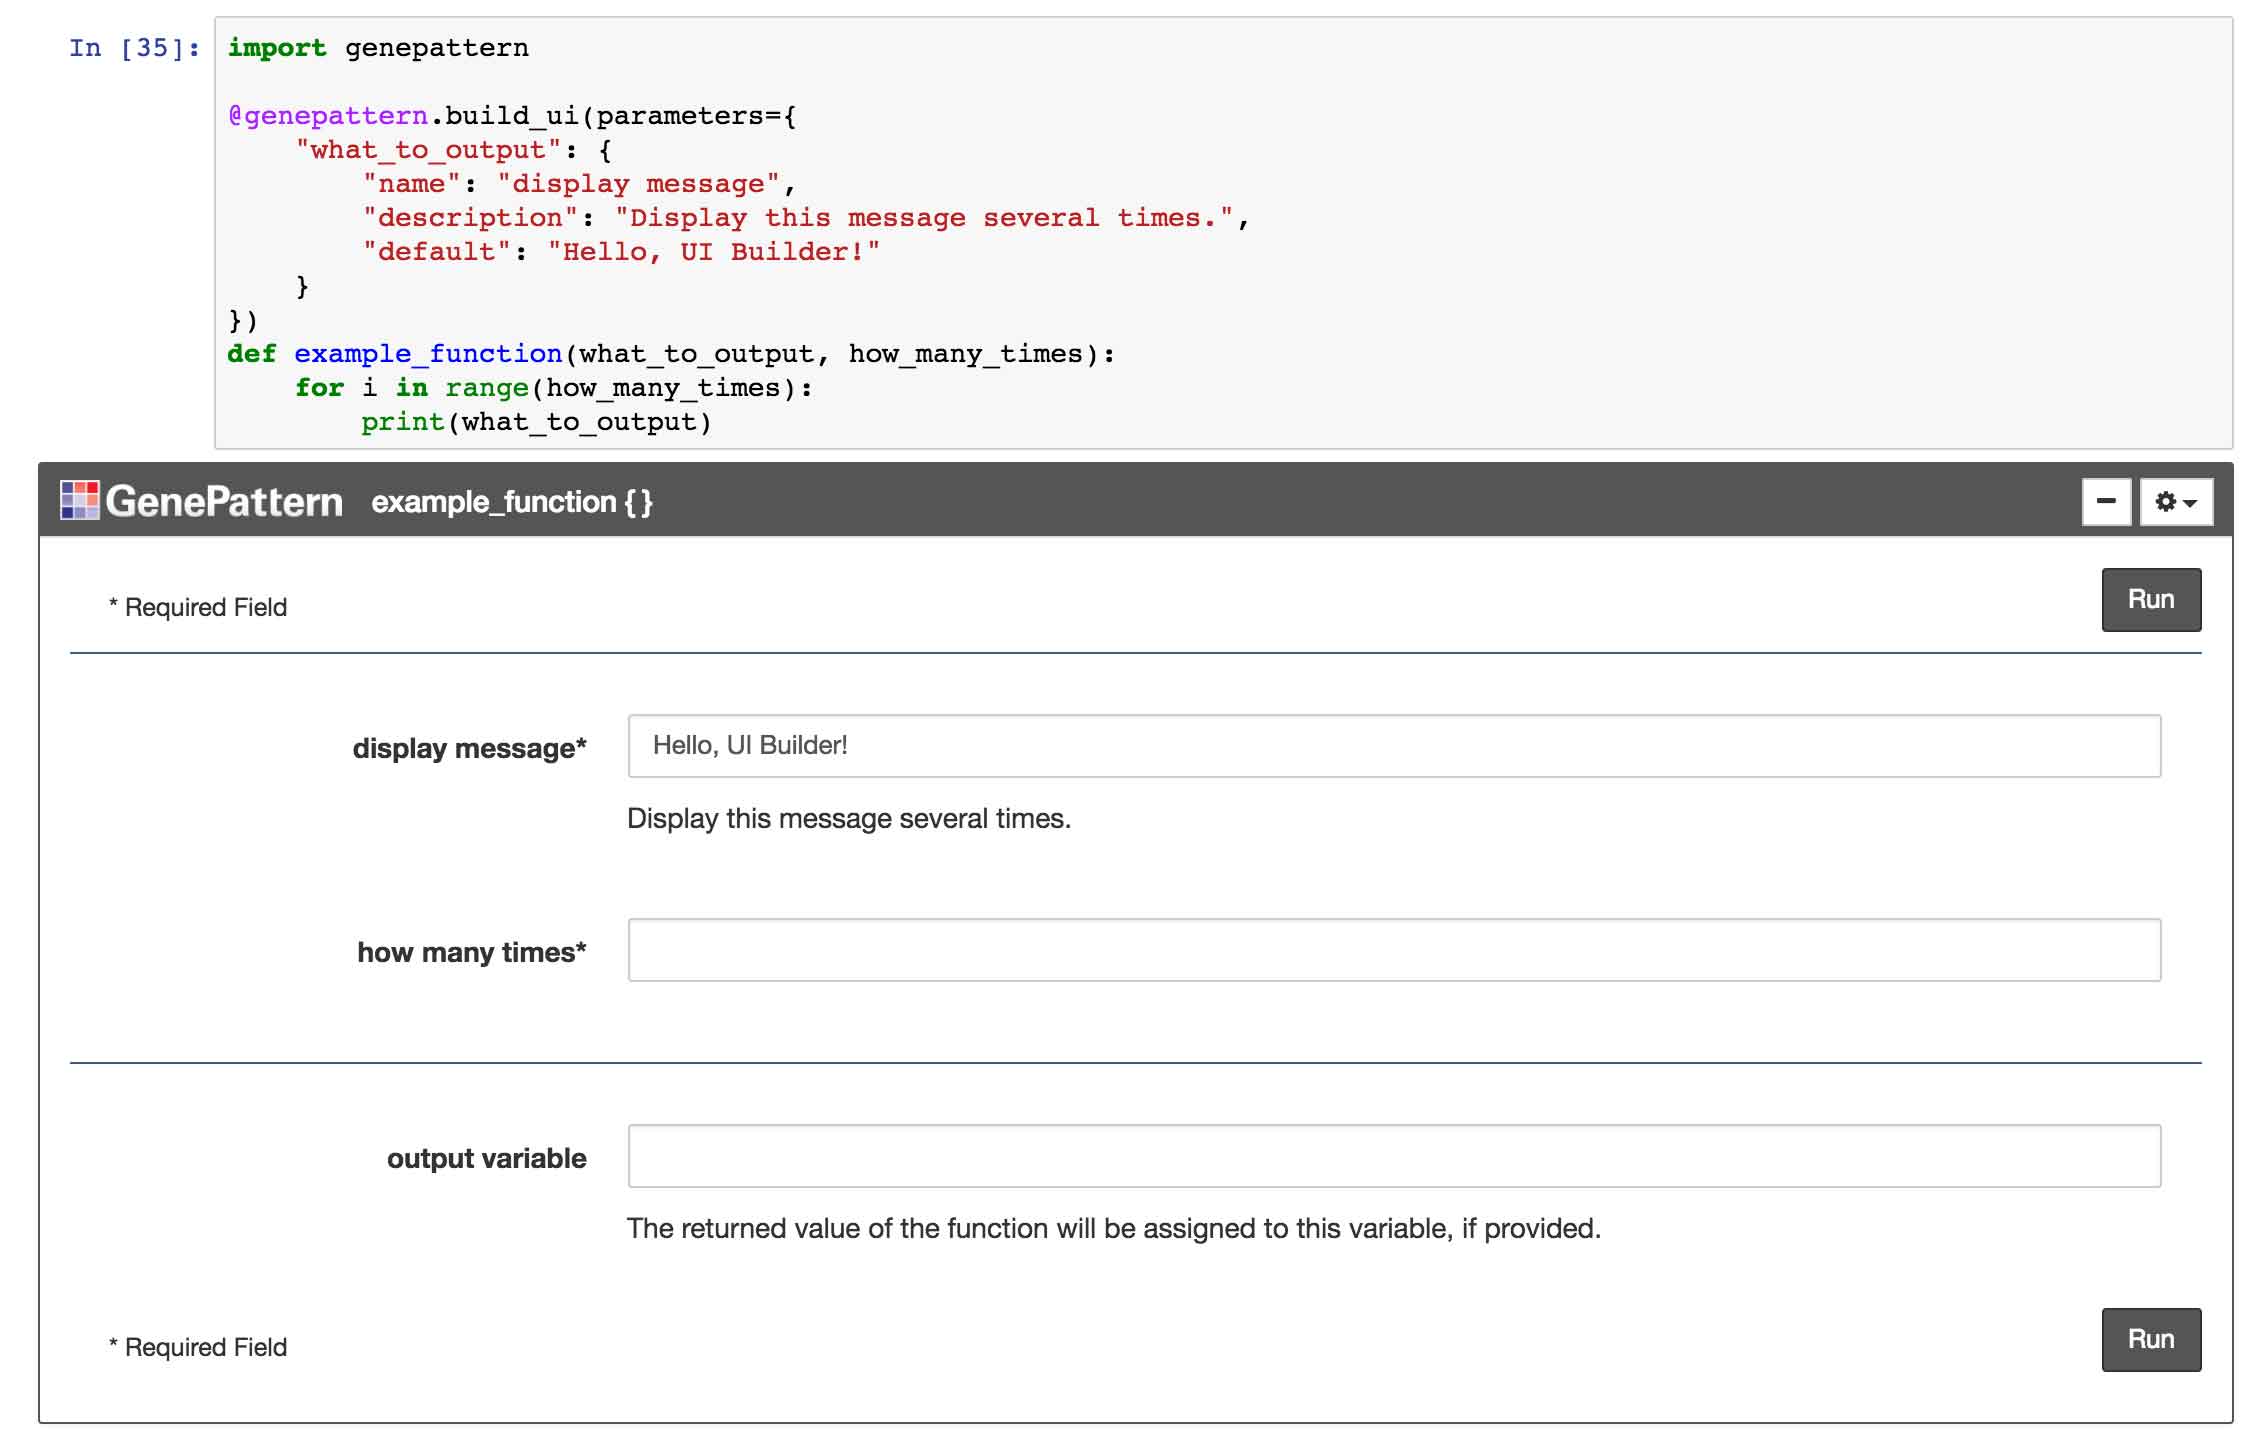
@nbtools.build_ui(parameters={
    "output_var": {
        "name": "results",
        "description": "The results of the function",
        "default": "variable_name",
        "hide": False,
    }
})
def example_function(a_text_param, a_number_param,
                     a_password_param, a_bool_param=True):
    . . .
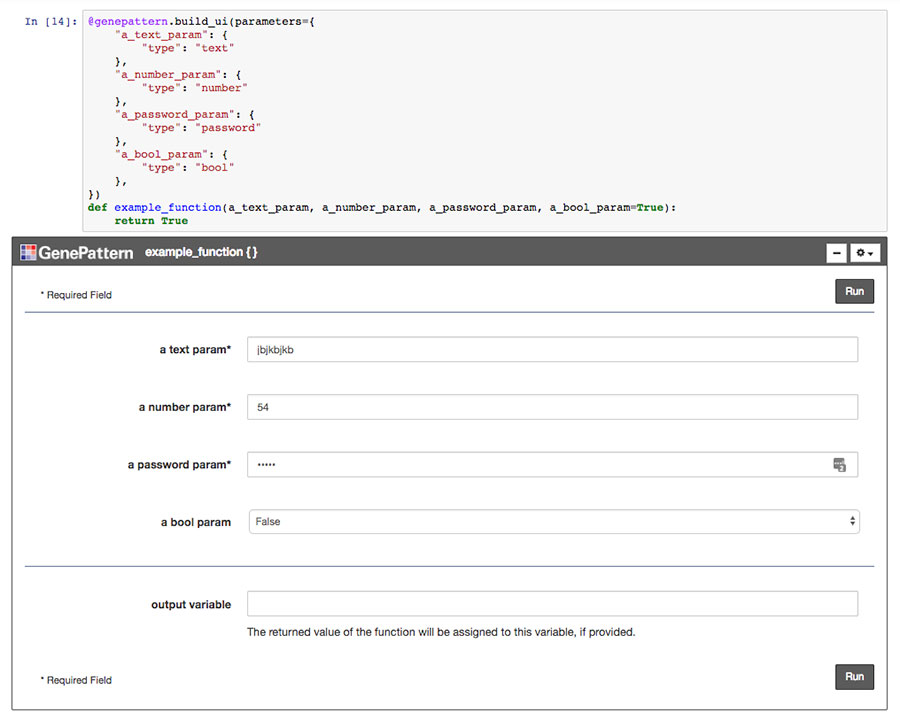
9. Parameter Types
The UI Builder supports a number of parameter types and implements features to make handling those types easier. Supported types include:
- Text: Supports any text value. Unless referencing an existing Python variable, any input gets cast to a Python string value. Text is also the default parameter type if no other type information has been specified or can be determined.
- Number: Accepts any numerical value and renders in a notebook as an HTML number input.
- Password: Works exactly like a text input, but obfuscates the input value as a password field.
- Color: Allows the user to select a color from the system's color picker interface.
- Choice: When provided with a list of choices, this input will render as a dropdown parameter, with the default value selected. Choice parameters are described in their own section below.
- Bool: A boolean input representing True and False. Renders as a choice parameter with those two choices.
- File: An input intended to receive a file or file-like object. File parameters are described in their own section below.
The UI Builder will infer a parameter's type from its default value, defaulting to a text parameter if no value is available or if the default value's type doesn't match one of the known types above. Alternatively, the developer can specify a parameter's type in the code. A code example is provided below, illustrating how to specify each type - except for choice and file parameters, which are each detailed in their own sections.
@nbtools.build_ui(parameters={
    "a_text_param": {
        "type": "text"
    },
    "a_number_param": {
        "type": "number"
    },
    "a_password_param": {
        "type": "password"
    },
    "a_bool_param": {
        "type": "bool"
    },
})
def example_function(a_text_param, a_number_param,
                     a_password_param, a_bool_param=True):
    . . .
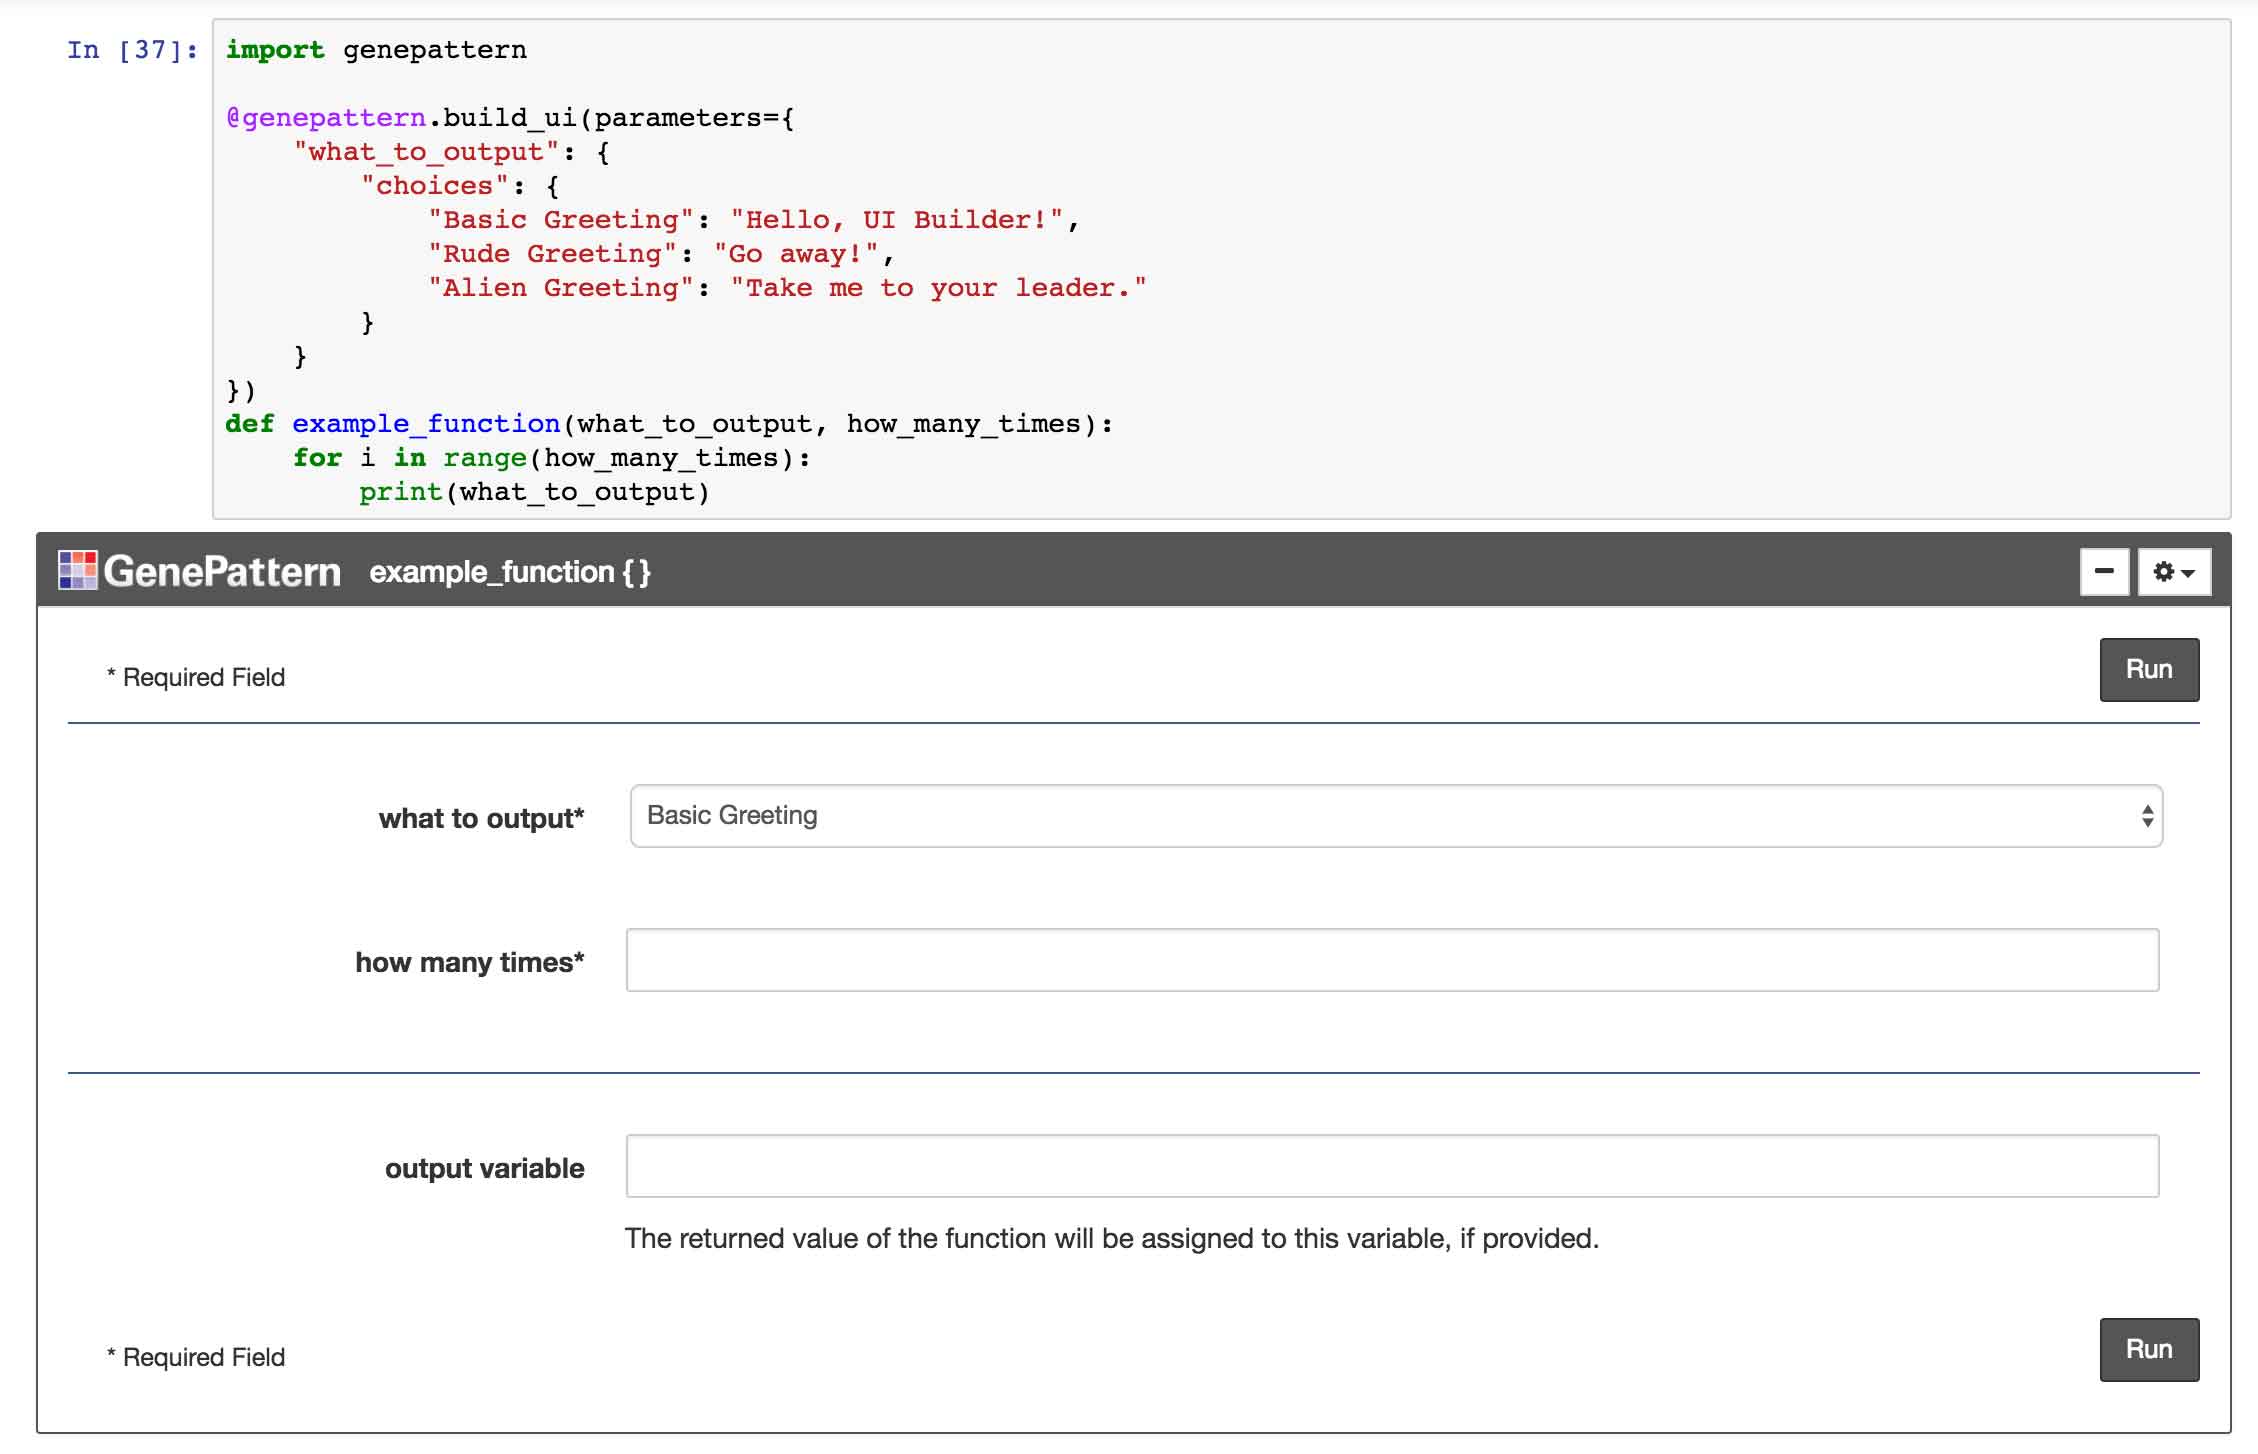
10. Choice Parameters
Sometimes a parameter only accepts a limited set of valid input values. This is often represented in a user interface as a dropdown (select) input. The UI Builder has support for this functionality. To change a particular parameter into a dropdown input, simply provide the parameter with a dictionary of available choices. A code example is given below.
@nbtools.build_ui(parameters={
    "param_1": {
        "default": "some_value",
        "type": "choice",
        "choices": {
            "foo label": "foo value",
            "bar label": "bar value",
            "some_label": "some_value"
        }
    }
})
def example_function(param_1, param_2):
    . . .
11. File Parameters
File parameters are intended to handle input representing a file or file-like object. They are integrated with UI Output widgets, such that available files will appear in a menu when a file parameter is first selected, thereby allowing the user to easily select the desired file.
Optionally, the developer can specify the kinds of files that a file parameter accepts. This is accomplished by providing a list of file extension strings. For example, a parameter that expects a gct, odf or res files would list: ["gct", "odf", "res"].
It is worth noting that when a file is selected in the menu, the value provided to the function will actually be a string containing a URL to the specified file. The developer may then take this string and use it to create a file-like object, pass it to a function that will download the file or otherwise perform any desired tasks.
A code example is provided below.
@nbtools.build_ui(parameters={
    "param_1": {
        "type": "file",
        "kinds": ["gct", "odf"]
    }
})
def example_function(param_1, param_2):
    . . .
Similar to choice parameters, a file parameter may likewise be given a list of possible options. These options will appear in a dropdown when the parameter it selected.
@nbtools.build_ui(parameters={
    "param_1": {
        "type": "file",
        "choices": {
            "Example Label #1": "ftp://fake.example.com/example_1.csv",
            "Example Label #2": "ftp://fake.example.com/example2.csv",
            "Example Label #3": "ftp://fake.example.com/example_3.csv"
        }
    }
})
def file_choice_example(param_1):
    . . .
12. Client-side Interactivity
Notebook authors who wish to integrate the UI Builder with client-side programmatic functionality can make use of the id
and events attribute of parameters.
The id attribute allows the author to specify an ID for the parameter's element in the DOM. As with all DOM IDs, it must be both unique and adhere to the naming rules in the HTML specification.
The events attribute allows the author to attach Javascript functionality to the parameter. It should be specified as a
dict, where the keys are Javascript events and the values are strings containing the Javascript code to be executed.
An example of using both of these attributes is given below.
@nbtools.build_ui(parameters={
    "param_1": {
        "id": "example_function_param_1",
        "events": {
            "click": "console.log('Hello World!');"
        }
    }
})
def example_function(first_parameter, second_parameter):
    . . .
Additionally, the top-level events attribute is available for handling events associated with the UI Builder widget
itself, rather than individual parameters. This accepts a dictionary pairing event names to strings containing Javscript
to be executed when the event occurs. Supported events are presented below:
- load: Executed when the widget is initialized.
- run: Event fires when the Run button is clicked.
- click: Executed when the widget is clicked.
- focus: Event fires when the widget obtains focus.
@nbtools.build_ui(
    events={
        "load": "console.log('Write to the Javascript console when the widget is loaded.')",
        "run": "console.log('Write to the Javascript console when the Run button is clicked.')"
    }
)
def example_function(first_parameter, second_parameter):
    . . .
13. Send to Text
Specific text options can be made easily accessible from a text input by annotating them with the nbtools-text-option class. Any text annotated in this way will appear in a dropdown whenever a text input parameter is selected.
<span class="nbtools-text-option">Text to send to parameter</span>
14. Look and Feel
The look and feel of a UI Builder widget can be customized by setting any of the following options:
- color: Sets the header and border color of the widget. (default based on the current JupyterLab theme)
- logo: A URL pointing to the logo to display in the UI Builder header. Setting its value to 'None' turns off displaying the logo entirely.
- run_label: Change the label on the Run buttons. (default='Run')
- display_header: Toggle whether to display the UI Builder header. (default=True)
- display_footer: Whether or not to display the UI Builder footer. (default=True)
@nbtools.build_ui(color='#0000FF', logo='http://custom.logo', run_label='Execute', display_header=False, display_footer=False)
def example_function(first_parameter, second_parameter):
    . . .
15. Messages
These values can be set in order to display a message to the user. Usually they are used to bring attention to an error or to highlight important feedback.
- info: Sets an informative message to display to the user in a highlighted info callout.
- error: Sets an error message to display to the user in an error callout.
@nbtools.build_ui(info='You must do something before running this method', error='An error was encountered performing method')
def example_function(first_parameter, second_parameter):
    . . .
uibuilder = UIBuilder(f)
uibuilder.info = 'You must do something before running this method'
uibuilder.error = 'An error was encountered performing method'
16. Menu Items
Set extra_menu_items to a dict of additional menu items to display in the widget's gear menu. The key should be the label to display in the menu and the value should be a dict containing the action to perform and the code to execute. Valid actions are:
- cell: Creates a new cell below the current one, inserts the provided Python code and executes that cell.
- method: Executes the indicated function in the Python kernel.
A code example is provided below.
@nbtools.build_ui(extra_menu_items={
    'Show Help Information': {
        'action': 'cell',
        'code': 'help(nbtools)'
    }
})
def example_function(first_parameter, second_parameter):
    . . .
@nbtools.build_ui(extra_menu_items={
    'Call Function': {
        'action': 'method',
        'code': 'method_name'
    }
})
def example_function(first_parameter, second_parameter):
    . . .
17. Other Options
The following minor features are available available in the UI Builder.
- register_tool: Sets whether to register this function with the tool registry. Defaults to True.
- function_import: Override the import name of an existing function.
- collapse: Set whether the widget collapses upon submission (default=True).
- collapsed: Set whether the widget is currently expanded or collapsed (default=True).
- busy: Set whether the widget controls are disabled because it is busy. (default=False)
- license: Sets the test of a license ageement to be displayed and agreed to before the tool is executed, as well as whether the license has already been agreed to or not. This parameter expects a dict with a 'text' key for the license text and a 'callback' key with a boolean value specifying whether the user has already agreed to the license. A callback function can be attached as an observer to the 'callback' value.
@nbtools.build_ui(register_tool=False, function_import='example_package.example_function', collapse=False, collapsed=False, busy=True)
def example_function(first_parameter, second_parameter):
    . . .
UI Output
UIOutput is a widget that can be created programmatically and displayed as the output to a UI Builder cell or any code
cell. It's intended to display results in a fashion similar to a GenePattern or Galaxy analysis widget, thereby providing a
consistent user interface.
1. Create the widget
The simplest way to create a UIOutput widget is to import the widget and then call the constructor.:
import nbtools

nbtools.UIOutput()
2. Specify Parameters
The UIOutput widget supports a number of parameters, which should be set to present as output. Options include:
- appendix: An ipywidget instance that will be appended to the
UIOutputwidget. - collapsed: Set whether the widget is currently expanded or collapsed (default=True).
- description: A text blurb describing what is being output.
- files: A list of URLs to files being output by the widget, or a list of (display name, value, kind) tuples.
- name: A name to display in the header of the widget.
- status: A terse indicator of the output status.
- text: Intended for long text output, such as logging or other information.
- visualization: A URL that will be displayed in an iframe or an HTML blob that will be displayed
- origin: Set an origin identifier so that event callbacks can be limited to UIOutput widgets with a particular origin. Usually this origin matches the origin of the
UIBuilderwidget which created the UIOutput.
import ipywidgets
import nbtools
# Create an ipywidget to append
text_input = ipywidgets.Text()
nbtools.UIOutput(appendix=text_input, collapsed=True, description='Output from the analysis',
                 files=['http://foo.bar/foo.txt', 'http://bar.foo/bar.rds'], name='Job Output', status='Running',
                 text='Running job...', visualization='http://foo.bar/heatmap.html')
3. Dynamically Updating Status
The parameters of a UIOutput widget can be dynamically updated by setting the relevant property of the widget object.
This is useful for long-running analyses, as it can be used to update the status and other information as the analysis
progresses.
uio = nbtools.UIOutput(status="Running")
# Perform long-running analysis here
uio.status = "Complete"
uio.visualization = "http://foo.bar/heatmap.html"
4. Look and Feel
The look and feel of a UI Output widget can customized by setting any of the following options:
- color: Sets the header and border color of the widget. (default based on the current JupyterLab theme)
- logo: A URL pointing to the logo to display in the UI Output header.
nbtools.UIOutput(color='#0000FF', logo='http://custom.logo')
5. Messages
These values can be set in order to display a message to the user. Usually they are used to bring attention to an error or to highlight important feedback.
- info: Sets an informative message to display to the user in a highlighted info callout.
- error: Sets an error message to display to the user in an error callout.
UIOutput(info='Something you should know about this output.', error='A problem with this output.')
uioutput = UIOutput()
uioutput.info = 'Something you should know about this output.'
uioutput.error = 'A problem with this output.'
6. Menu Items
- extra_file_menu_items: A dict of additional menu items to appear in the menu for each file.
- extra_menu_items: A dict of additional menu items to display in the widget's gear menu.
The key for all menu items should be the label to display in the menu and the value should be a dict containing the action to perform and the code to execute. Valid actions are:
- cell: Creates a new cell below the current one, inserts the provided Python code and executes that cell.
- method: Executes the indicated function in the Python kernel.
A code example is provided below.
nbtools.UIOutput(extra_menu_items={
    'Show Help Information': {
        'action': 'cell',
        'code': 'help(nbtools)'
    }
})
nbtools.UIOutput(extra_menu_items={
    'Call Function': {
        'action': 'method',
        'code': 'method_name'
    }
})
In addition, menu items created for the file menus will have the following variables available for use in their actions:
- file_name: The name of the file the action is being expected on.
- type: The type of the file the action is being expected on.
- widget_name: The name of the widget the action is being called from.
A code example is provided below.
nbtools.UIOutput(extra_file_menu_items={
    'Get File': {
        'action': 'cell',
        'code': 'package.get_file("{{file_name}}")'
    }
})
Data Panel
The Data Panel is a pane in g2nb that gives easy access the data currently being worked with in the notebook. g2nb-enabled tools are encouraged to register their data with the panel. Data can be accessed or queried from its registry using the following method calls.
1. Data Object
Files or other data are registered with the Data Panel using an object of the Data class. Objects of this class have the following properties:
- origin: A string representing the origin of the data. This string should ideally match the origin string of any tools created using the UI Builder or UI Output widgets.
- group: A string representing any subgrouping of the data under the origin. This might be used to represent categories, directories, job IDs or similar.
- uri: An identifier unique to the data within the chosen origin. Often this is a file path, URL or UUID.
- kind: A string identifier of the format the data is in. Often this is a file extension or mime-type. This string should match the listed kind of any relevant file input listed within a UI Builder widget.
- load: An optional function that gets executed when the data is loaded. A reference to the
Dataobject is passed as a parameter to the function.
data = nbtools.Data(origin='Tool Name', group='Misc. Data', uri='./tabular.csv', kind='csv', load=lambda d: print(d))
2. Register Data
Data can be registered with the panel by passing a Data object to the DataManager.register() method. Similarly, a list of Data objects can be registered by passing the list to the DataManager.register_all() method. The DataManager itself is a singleton that can be accessed using the DataManager.instance() method.
# Register data represented in a Data object
nbtools.DataManager.instance().register(data)

# Register a list of data objects
nbtools.DataManager.instance().register_all([data1, data2, data3])
3. Unregister Data
Data can be removed from the registry by passing its matching origin and uri to the DataManager.unregister() method.
# Unregister data
nbtools.DataManager.instance().unregister(origin='Notebook', uri='./tabular.csv')
4. Data Exists
You can check whether or not data with a specific origin and uri has been registered using the DataManager.exists() method.
# Does this data exist in the registry? Returns a boolean value.
nbtools.DataManager.instance().exists(origin='Notebook', uri='./tabular.csv')
5. List Data
You can obtain a list of all currently registered data by calling the DataManager.list() method.
# Iterate over all data in the registry
for d in nbtools.DataManager.instance().list():
    print(d)
5. Filter Data
Finally, you may obtain a filtered list of all currently registered data by calling the DataManager.filter() method.
# Iterate over all registered data with the 'Notebook' origin
for d in nbtools.DataManager.instance().list(origin='Notebook'):
    print(d)